File Attachments - Keeping Documentation Together
Maestro supports the attaching - to shipments - of electronic copies of paperwork , saving the need of printing / reprinting the document out multiple times or emailing it around. Many documents can be attached, and most file formats are supported, such as photos, Word documents or Excel Spreadsheets, PDF files and so on.
Pre-Alerts
A key example of when this is useful is when one Marken branch needs to update another branch with one or more documents for Shipments. Attaching the actual documents clogs up the email servers, especially when the files are large and multiple recipients are involved. Worse than that, if the document needs to change, or gets updated, that electronic copy is now irrelevant. See how to share documents by using the link: See "Sharing Details Of Shipment Documentation With Other People"
Attaching Files to a Shipment
Only one file can be uploaded at a time; the upload process copies the selected file into Maestro, and the original file remains unaffected. Each file may not be more than 10 Megabytes in size.
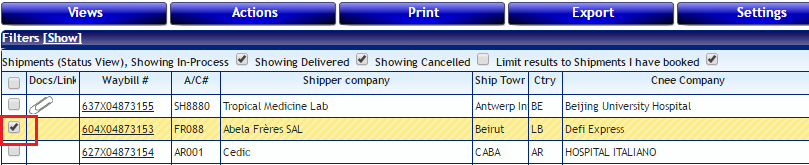
Navigate to the Shipping Manager, and then perform the following steps:
- Tick the check-box for the shipment required:
- There are two ways to get the attach files menu option
Either: point to (put your mouse-over) the Actions menu and then select Attach Files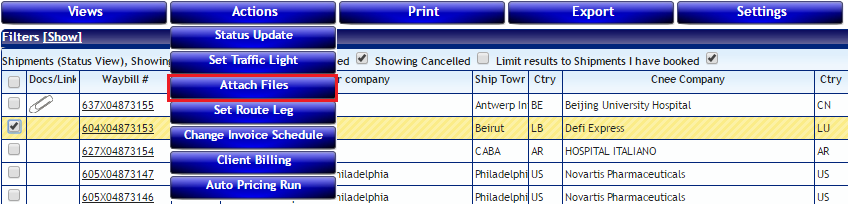
OR
you can right-click in the Docs/Links column and choose Attach Files from the pop-up menu: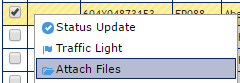
- Select a category that describes the type of file to be uploaded from the list of file categories:
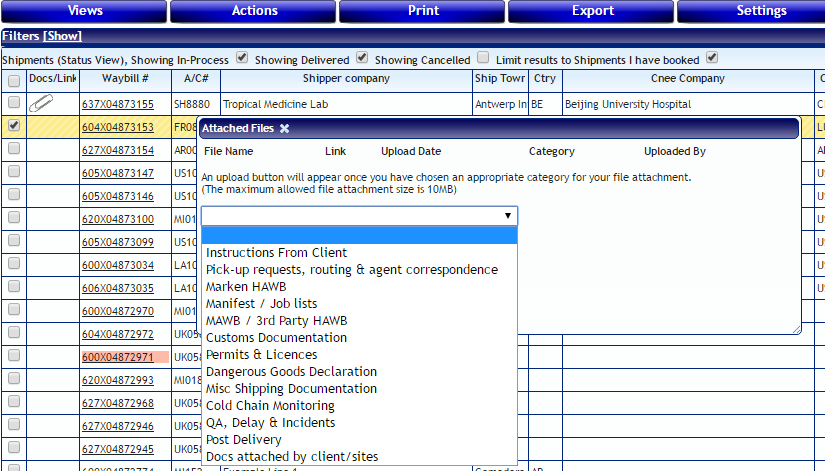
Note: The file category list will only display "Docs attached by client/sites" if you don't work directly for Marken.
- To browse for your file, click theUpload a file button which will open up a File Explorer.
Locate your file and then select it. - When you select the file, upload progress will be displayed - as a % figure. To cancel the upload, click Cancel.
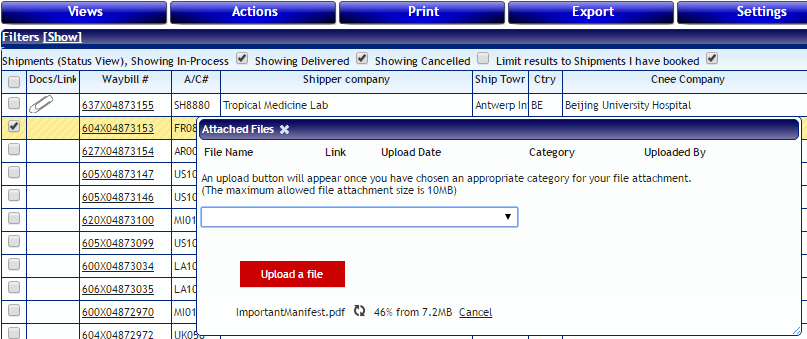
- Successful file attachments will appear in a list when complete.
You can attach more documents by repeating the process. - Click the X immediately following the Attached Files heading to close the file attachment window.
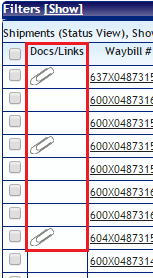
- The shipment grid will reload, and a paper clip will appear beside the shipment to indicate that there is one or more attachments. Click the paper clip to view, add, or remove attachments.
You can always view the documents you uploaded.
Note: The paper clip will appear only if your role allows you to view the attachment.
Clients cannot access Marken files. Marken employees can access all files.
Sharing Details Of Shipment Documentation With Other People
Once a shipment has had documents attached to it, there is a simple and quick way to share that information which means you don't have to make another copy of those files and attach them to an email - which can be slower to do, slower to send and clog up the mailboxes of everyone involved!
A URL is a "web address" or "hyper-link". The following steps show how to get this special link for any file attachment in Maestro, which you can then put into an email, so that when someone clicks on it, it will behave just as if you clicked on the File Name
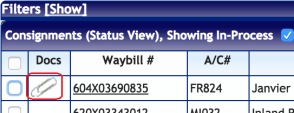
First of all, click on the paper clip icon to bring up the list of all the files attached to that shipment ...
File Attachment List
This will pop up a page that shows the details of all files that have been attached to this shipment, such as in the following screen-shot;
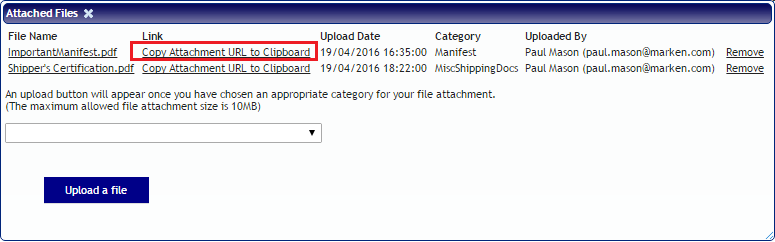
Find the file that you are interested in, and then;
- click on the Copy Attachment URL to Clipboard option in the "Link" column
- Go to the email or document being written, right-click and choose the Paste option from the menu that pops up.
- The unique address should be pasted into your email or other document
That should be all there is to it!
Until this becomes a familiar process, it may be a good idea to double check that the link is correct by simply clicking on it; the required document should open up. If it doesn't, try this;
- Each click inside of the URL field toggles the highlighting - you need it to all be highlighted and THEN right-click and choose copy
Note that whoever clicks on that link will need to be have a Maestro account and be allowed to view attachments.
Other File Attachment Options
- To remove a file, click on Remove at the end of the line to delete the file.
A popup will confirm "Are you sure..." that this is what is wanted, so that files are not removed accidentally.
Note that if you can't see the Remove option, drag the bottom right hand corner of the "Attached Files" window down and right to make the window bigger. - Click the underlined File Name to open the attachment
depending on your computer it might open up that document in a window or download it for you to read later.